This article covers the basics of full backup backups and restores in SQL Server. The examples are from SQL Server 2005 however it applies to SQL Server 2000 and SQL Server 2005. This is a very basic article covering full database backups, database restores and the simple and full recovery models.
In a typical installation SQL Server stores its data in two files. One has an MDF extension and stores the data itself and the other has an LDF extension and stores the transaction log. You can configure SQL Server to have multiple data files and multiple transaction log files if you'd like but that's beyond the scope of this article. When SQL Server processes a transaction it goes through the following steps:
1. It writes what it's going to do to the transaction log.
2. It makes the change to the data file. This change is typically made on the in-memory copy of that portion of the data file.
3. It writes to the log that the transaction is committed.
4. The CHECKPOINT process writes the portion data file associated with the transaction to disk. This might happen anywhere from seconds to minutes after the step above.
5. It writes to the log that the transaction is "hardened".
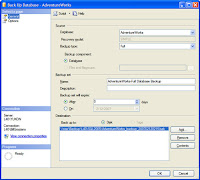
The simplest type of backup is the Full Backup. The screen shots below are from SQL Server 2005's Management Studio (SSMS). SQL Server 2000's Enterprise Manager (EM) is very similar. In SSMS you right click on the database and choose Tasks -> Backup to bring up the window shown below.
At a minimum you need to verify three things on this screen. First, that the correct database is selected. Second, that the backup type is set to FULL. Finally you need to choose the backup file name. On the Options tab you can specify whether SQL Server should replace or append the backup to the backup file. Keep in mind that the backup file is relative to where SQL Server is installed and not where you're running SSMS.

If you want to issue a backup statement yourself you can use SSMS to script it out for you. Click the Script button at the top of the dialog box and SSMS will generate this SQL statement for you:
BACKUP DATABASE [AdventureWorks] TO
DISK = N'\\nas\Backup\L40\SQL2005\AdventureWorks_backup_200702120215.bak'
WITH NOFORMAT, NOINIT, NAME = N'AdventureWorks-Full Database Backup',
SKIP, NOREWIND, NOUNLOAD, STATS = 10
You can see how these options map back to the dialog box. The NOINIT clause is what says to append the backup to the existing backup file. The other option is INIT which will overwrite the backup file. The BACKUP statement will create a single file with a BAK extension that contains what is in your data file and log file. You can backup the database while SQL Server is running and people can still use the database. It might be a little bit slower depending on your disk throughput.
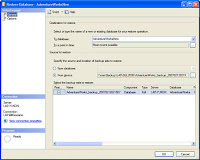
Restoring a database is a little more complicated. Right-clicking on Databases in SSMS bring up a dialog box like this:

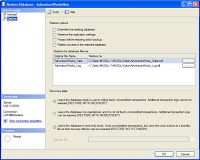
I've already changed the database name to AdventureWorksNew. I clicked the From Device radio button and navigated to my backup file. If you're restoring on the same computer where the original database resides you can just leave the From Database radio button selected and choose the database. It will automatically select the backup. Clicking on the options tab brings us to the second part of the dialog:

Notice that it wants to restore the two file names right on top of the file names for AdventureWorks. SQL Server won't actually let you do that unless you check the "Overwrite the existing database" checkbox above. You'll need to edit those filenames to change the name. If I script this statement out it gives me this:
RESTORE DATABASE [AdventureWorksNew]
FROM DISK = N'\\nas\Backup\L40\SQL2005\AdventureWorks_backup_200702120215.bak'
WITH FILE = 1,
MOVE N'AdventureWorks_Data' TO N'C:\Data\MSSQL.1\MSSQL\Data\AdventureWorksNew_Data.mdf',
MOVE N'AdventureWorks_Log' TO N'C:\Data\MSSQL.1\MSSQL\Data\AdventureWorksNew_Log.ldf',
NOUNLOAD, STATS = 10
Notice the MOVE commands have the new file name that I typed in.
One thing to be aware of is the SQL Server Recovery Model. If you right-click on a database and choose Properties and then click the Options tab you'll see the recovery model as the second item listed. The two main settings for this are Simple and Full. In Simple Recovery SQL Server doesn't keep transactions in the transaction log that have already been "hardened" to disk. They are automatically removed and the space in the file is reused. In Full Recovery mode SQL Server keeps every transaction in the transaction log file until you explicitly backup the transaction log. Simple Recovery mode is better for developers or servers that are only backed up nightly. In Full Recovery mode you'll need to do transaction log backups which I'll cover in a future article. If you see your database growing larger and larger the most likely cause is a growing transaction log. To resolve this, change the recovery model to Simple, backup the database and then shrink the database. You can shrink the database by right-clicking on the database and choosing Tasks -> Shrink -> Database and then clicking OK.
When you create a database, SQL Server starts with a copy of the "model" database. If you set the Recovery Model of the "model" database to Simple all future databases will start out in Simple Recovery mode.Labels: Backup, Restore, SQL Server |


