|
| Wednesday, November 21, 2007 |
| Deploying ASP.NET Applications |
Introduction
Before looking at the different steps involved in setting up and deploying an ASP.NET Web application, it is important to understand the difference between Setup and Deployment. Setup is an application or process that allows you to package up your application into an easy-to-deploy format, which can then be used to install the application on the target server. Deployment is the process of taking the application and installing it in on another machine, usually by the use of a setup application.
At one time or another, most computer users would have experienced the dark side of installing Windows programs. For example, when you install a new version of your application, the installation program copies the new version of your dlls in the system directory and makes all the necessary registry changes. This installation might potentially have an impact on other applications running on the machine, especially if an existing application was using the shared version of the installed component. If the installed component is backward compatible with the previous versions, then it is fine, but in many cases it may not be possible to maintain backward compatibility with the older versions. If you cannot maintain backward compatibility, you will often end up breaking the existing applications as a result of new installations. This infamous problem is referred to as Dll Hell.
Visual Studio .NET (VS .NET) was designed to address the installation shortcomings of Windows applications that have always relied heavily on COM components. Since VS .NET applications rely on .NET Framework class libraries (that are built on a completely different programming model) for much of their functionality, it is possible to simplify the installation process to a great extent. In addition, VS .NET applications are compiled as assemblies, a deployment unit consisting of one or more files for the assembly to run. The Microsoft .NET Framework introduces several features aimed at simplifying application deployment and solving DLL Hell. The .NET Framework enables this simplification by providing features such as application isolation and side-by-side components. For example, configuration settings can be stored in a configuration file (web.config) which is just a text file based on eXtensible Markup Language (XML) and then deployed to the target server using XCOPY type of mechanisms. Before starting a discussion on the different deployment options, let us understand the structure of an ASP.NET application that enables you to easily deploy the application on the target server.
Structure of an ASP.NET Web Application
An ASP.NET application consists of all the Web pages (.aspx and HTML files), handlers, modules, executable code, and other files (such as images and configuration files) that can be invoked from a virtual directory and its subdirectories on a Web server. An ASP.NET application also includes the compiled assembly (if the code-behind feature of .aspx files is used) and typically other assemblies that are used to provide functionality for the application. For example, you might have the business logic of the application encapsulated in a separate assembly. These assemblies are located in the bin directory underneath the virtual directory of the application. To understand how VS .NET simplifies the deployment process, you need to understand the structure of the assembly that provides for this simplification. Assemblies contain four elements:
* MSIL (Microsoft Intermediate Language) Code: When you compile your application code, it gets compiled into what is known as an MSIL code. MSIL is the code that the common language runtime can understand.
* Meta-data: Contains information about the types, methods and other elements defined in the code
* Manifest: Contains name and version information, a list of included files in the assembly, security information and so on
* Supporting files and resources
As you can see from the structure, assemblies are so comprehensive and self-describing that VS .NET applications don't need to be registered with registry, as is the practice when you are dealing with COM components. This means that VS .NET applications can be installed by simply copying the required files to the target machine as long as the target machine has the .NET Framework installed. This is called XCOPY Deployment. However, it is also possible to automate the deployment process by making use of the deployment projects that are provided by VS .NET. In the next section, we will see how to deploy a Web application using various deployment options provided by VS .NET.
Deployment Options Supported by .NET
You can deploy an ASP.NET Web application using any one of the following three deployment options.
* XCOPY Deployment
* Using the Copy Project option in VS .NET
* Deployment using VS.NET installer
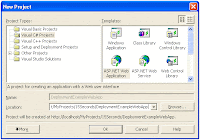
In the following sections, you will be provided with an in-depth look at all of the deployment options available in .NET. For the purposes of this article, let us create a new Visual C# ASP.NET Web application named DeploymentExampleWebApp as shown in the following screenshot.
We will use the above project to show the different ways of deploying a Web application.
XCOPY Deployment
One of the primary goals of the .NET Framework is to simplify deployment by making possible what is known as XCOPY deployment. Before looking at how .NET enables XCOPY deployment, let us take a moment to understand what XCOPY deployment is. Prior to .NET, installing a component (for example, a COM Component) required copying the component to appropriate directories, making appropriate registry entries, and so on. But now in .NET, to install the component all you need to do is copy the assembly into the bin directory of the client application and the application can start using it right away because of the self-describing nature of the assembly. This is possible because compilers in the .NET Framework embed identifiers or meta-data into compiled modules and the CLR uses this information to load the appropriate version of the assemblies. The identifiers contain all the information required to load and run modules, and also to locate all the other modules referenced by the assembly. It is also refered to as zero-impact install since the machine is not impacted by way of configuring the registry entries and configuring the component. This zero-impact install also makes it possible to uninstall a component without impacting the system in any manner. All that is required to complete uninstallation is the removal of specific files from the specific directory. For performing this type of deployment, all you need to do is to go to the Command Prompt and copy over the required files to a specific directory on the server using the XCOPY command.
The following screenshot illustrates the use of XCOPY deployment to deploy the Web application named DeploymentExampleWebApp to the target server named RemoteServer.
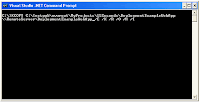
As you can see, the XCOPY command takes a number of arguments.
* / E - This option copies directories, subdirectories, and files of the source argument, including empty ones.
* / K - This option allows you to retain all the existing file and folder attributes. When you use XCOPY to copy files or a directory tree structure, XCOPY strips off file attributes by default. For example, if a file had the read-only attribute set, that attribute would be lost after the file is copied. To retain the original attributes with the copied files, you must use the / K parameter.
* / R - This option overwrites files marked as read only.
* / O - This option preserves all security-related permission ACLs of the file and folders.
* / H - This option copies both hidden and system files.
* / I - This option tells XCOPY to assume that the destination is a directory and create it if it does not already exist.
Please refer to the MSDN help documentation for more information on the different options supported by XCOPY command.
Once the folder is copied over to the target server, you then need to create a virtual directory on the target server (using Internet Information Manager MMC snap-in) and map that virtual directory to the physical directory that is created using the XCOPY command. That's all there is to deploying an ASP.NET Web application on a remote server using XCOPY Deployment.
Using the Copy Project Option in VS .NET
The Copy Project option in VS .NET makes it very easy to deploy ASP.NET Web applications onto the target servers. Using this option, you can copy the Web project to the same server or to a different server.
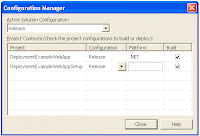
If you are using VS .NET to develop Web applicatons, the first thing that you need to do before packaging an ASP.NET Web applications is to change the Active Solution Configuration from Debug to Release as shown below. This allows the compiler not only to optimize the code but also remove the debugging related symbols from the code, making the code run much faster. To bring up the Configuration Manager, select your Web project from the Solution Explorer and select Project->Properties->Configuration Properties from the menu and then click on the Configuration Manager Command button. In the Active Solution Configuration combo box, select the Release option.
To copy the Web project onto the target server, select Project->Copy Project from the menu. Selecting that option will result in the following dialog box being displayed.
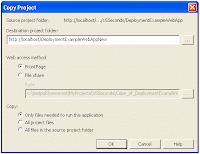
The Copy Project dialog provides the following options.
* Destination Project Folder: Using this option, you can specify the location to which you want to copy the project. The location can be the same server or a remote server.
* Web access method: The Web access method option determines the access method that is used to copy the Web project to the destination folder. There are two types of Web access methods.
o File share: This option indicates that you want to directly access your project files on the Web server through a file share. It does not require FrontPage Server Extensions on the server.
o FrontPage: This option specifies that you want to use the HTTP-based FrontPage Server Extensions to transfer your project files to the server. Before using this option, make sure FrontPage Server Extensions are installed on the server. This option will automatically create the required virtual directory on the target server.
* Copy: The Copy option provides three types:
o Only files needed to run this application: this option copies built output files (DLLs and references from the bin folder) and any content files (such as .aspx, .asmx files). Most of the time, you should be able to deploy the application using this default option.
o All project files: this option copies built outputs (DLLs and references from the bin folder) and all files that are in the project. This includes the project file and source files.
o All Files in the source project folder: choosing this option will result in all the project files and any other files that are in the project folder (or subfolder) being transferred to the destination folder.
To copy the Web project, select the appropriate options from the above Copy Project dialog box and click OK. This will result in the ASP.NET Web application being deployed on the target server.
Deployment Using VS .NET Web Setup Project
Even though XCOPY deployment and Copy Project options are very simple and easy-to-use, they do not lend themselves well to all of the deployment needs. For example, if your application requires more robust application setup and deployment requirements, VS .NET installer can be the right choice. Although you can distribute your Web application as a collection of build outputs, installer classes, and database creation scripts, it is often easier to deploy complex solutions with Windows Installer files. VS .NET provides Web setup projects that can be used to deploy Web applications. These Web setup projects differ from standard setup projects in that they install Web applications to a virtual root folder on a Web server rather than in the Program Files folder, as is the case with the applications installed using standard setup projects.
Since VS .NET installer is built on top of Windows Installer technology, it also takes advantages of Windows Installer features. Before starting on a discussion of VS .NET Web Setup Project, let us understand the architecture of Windows Installer technology that provides the core foundation on top of which the VS .NET installer is built.
Windows Installer architecture
Windows Installer is a software installation and configuration service that ships with Windows 2000 and Windows XP operating systems and is freely distributed to all Win9x and NT4 platforms. Windows Installer Service maintains a record of information about every application that it installs. The Windows Installer runtime (MSI) inspects these records during the execution of deployment packages. When you try to uninstall the application, Windows Installer checks the records to make sure that no other applications rely on its components before removing it.
The Windows Installer divides applications into the following three levels.
* Product: It is something a user can install. For example, MS Word is a product that a user can install.
* Feature: A product is composed of multiple features. A feature is also the smallest unit of functionality of a product. For example, AutoCorrect functionality can be considered a feature of MS Word.
* Component: A component can be considered the smallest unit that can be shared across multiple features and components. It is very important to understand that the component in Windows Installer terms is not the same as the term component in the .NET Framework. A Windows installer component can be a single file or multiple files that logically belong together. It can be an executable, a dll, or a simple text file. A collection of components can form together to provide a feature and it is also possible for a component to be shared across multiple features. While features are specific to a product and identified by a name unique only within the product, components are global across all products installed on a machine. For example, the spell checker component of MS Word can be shared across all the applications that want to implement spell-checking feature.
Information related to a product such as features, components are described in a centralized repository known as Installation Database. The installation database is nothing but a file with the extension .msi that not only contains information about the features and components of the product but also about the sequence of user interfaces displayed during the installation of the product. Since the Windows installer is registered as a server application for files with a .MSI extension, it is automatically invoked by the shell when an .MSI file is opened by a user. When invoked in this way, the installer reads product information from the installation database file and determines whether the product is already installed. If the product is not yet installed, it launches the product's installation sequence, which is described in the database. If the product is installed, different logic can be invoked, such as to add and remove features or uninstall the product.
Features Provided by VS .NET Web Setup Project
The deployment project in VS .NET builds on features of the Windows installer by allowing us to perform the following operations.
* Reading or writing of registry keys
* Creating directories in the Windows file system on the target servers
* Provides a mechanism to register components
* Provides a way to gather information from the users during installation
* Allows you to set launch conditions, such as checking the user name, computer name, current operating system, software application installed, presence of .NET CLR and so on.
* Also makes it possible to run a custom setup program or script after the installation is complete.
In the next section, we will see how to deploy our DeploymentExampleWebApp using the VS .NET Web Setup Project.
Creating a Web Setup Project Using VS .NET Installer
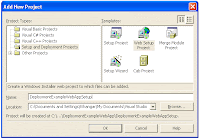
We will start by adding a new Web Setup Project to our DeploymentExampleWebApp ASP.NET Web application solution by selecting File->Add Project-> New Project from the menu. In the New Project dialog box, select Setup and Deployment Projects from the Project Types pane and then select Web Setup Project in the Templates pane as shown in the following figure.
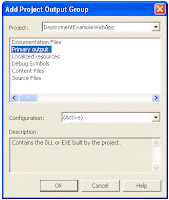
After creating the project, you then need to add the output of the primary assembly and the content files of the ASP.NET Web application to the setup project. To do this, right click on the DeploymentExampleWebAppSetup project in the solution explorer and select Add->Project Output from the context menu. In the Add Project Output Group dialog box, select DeploymentExampleWebApp from the Project combo box and select Primary Output from the list
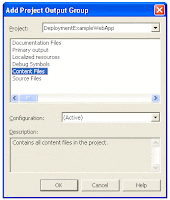
After adding the project output, you then need to add the related Content Files (such as .aspx files, Images, and so on) to the project. To do this, again bring up the Add Project Output dialog box and then select Content Files from the list this time. It is illustrated in the following screenshot.
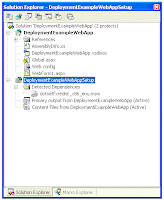
After adding the Primary output and the Content Files to the Web Setup project, the solution explorer looks as follows:
Configuring Properties through the Properties Window
There are a number of properties that you can set through the properties window of the Web Setup project. These properties determine the runtime display and behavior of the Windows installer file. To accomplish this, right click on the DeploymentExampleWebAppSetup project from the solution explorer and select Properties from the context menu to bring up its properties window. The dialog box shown below appears in the screen.
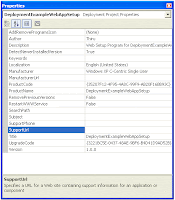
As can be seen from the above screenshot, the properties window provides properties such as Author, Description, Manufacturer, SupportPhone and so on that can be very useful to the users (who are installing your application) of your application to get more details about your application.
Installing the ASP.NET Web Application
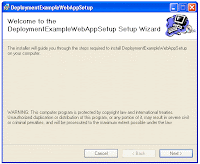
Once you have created the Windows installer file (.msi file), then installing the ASP.NET application in the target servers is very straightforward. All you need to do is to double-click on the .msi file from the Windows explorer. This will initiate the setup wizard, which will walk you through the installation steps. The following screenshot shows the first dialog box displayed during the installation.
Clicking on Next in the above dialog box results in the following dialog box, where you can specify the virtual directory that will be used to host this Web application. This is one of the handy features wherein the creation of virtual directory is completely automated obviating the need for manual intervention. In part two of this article, we will see how to set specific properties (such as Directory Security, Default Document and so on) on the virtual directory as part of the installation process.
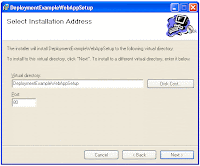
In the above dialog box, you can also click on the Disk Cost... command button to get an idea of the space required for installing this Web application. Clicking on Next in the above dialog box results in the following dialog box where you are asked to confirm the installation.
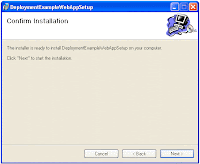
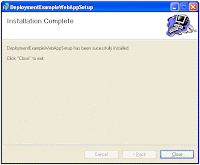
When you click on Next in the above dialog box, the installation will begin and the application will be installed. If the application is successfully installed, you will see the following dialog box.
After installing the application, you can see the installed ASP.NET application through the Add/Remove Programs option (that can be accessed through Start->Settings->Control Panel) in your computer. From here, you can run the setup program to uninstall the application any time you want to.
Conclusion
XCOPY and Copy Project options are ideal deployment scenarios that are simple and manually executed. Although they work well for simple scenarios, there are many cases, where a more robust deployment solution is required. In those scenarios, it is recommended that you use the Windows Installer technology to deploy applications. The following advantages of Windows Installer make it an ideal candidate for creating deployment packages for ASP.NET Web applications.
* If the application installed using the Windows installer gets corrupted, the applications can do a self-repair by using the repair feature of Windows installer packages. In the case of the deployments, you need to manually replace the corrupted component with the newer version.
* By using Windows installer technology, you can also take advantage of the automatic rollback feature, which not only ensures that the installed components are uninstalled but the machine is also brought back to the same stage before the installer started, if the installation fails.
* Since the Windows installer uses an MSI installation database for storing all of the information, it is possible to get the information about what files are copied, what registry keys are created, and so on.
* If you're developing an application that you want to distribute to multiple users (or sell as package), you need a more convenient, automated approach to deploy them. A manual deployment process such as XCOPY will not work due to the magnitude of the work involved. However by using a sophisticated installer technology such as Windows Installer, you can automate the entire installation process, thereby simplifying the deployment.
In this part, we demonstrated the different ways of packaging and deploying an ASP.NET Web application. We also understood how to take advantage of Windows installer technology to create .msi Windows installer files. In part two of this article, we will build on this Windows installer example by adding advanced functionalities such as customizing the installation dialog boxes and their sequence, installing registry entries, creating custom folders and so on as part of the installer.Labels: ASP.Net, Deployment |
posted by WebTeks @ 8:45 PM  |
|
|
|
| Monday, November 19, 2007 |
| BACKUP and RESTORE in SQL Server -- Full Backups |
This article covers the basics of full backup backups and restores in SQL Server. The examples are from SQL Server 2005 however it applies to SQL Server 2000 and SQL Server 2005. This is a very basic article covering full database backups, database restores and the simple and full recovery models.
In a typical installation SQL Server stores its data in two files. One has an MDF extension and stores the data itself and the other has an LDF extension and stores the transaction log. You can configure SQL Server to have multiple data files and multiple transaction log files if you'd like but that's beyond the scope of this article. When SQL Server processes a transaction it goes through the following steps:
1. It writes what it's going to do to the transaction log.
2. It makes the change to the data file. This change is typically made on the in-memory copy of that portion of the data file.
3. It writes to the log that the transaction is committed.
4. The CHECKPOINT process writes the portion data file associated with the transaction to disk. This might happen anywhere from seconds to minutes after the step above.
5. It writes to the log that the transaction is "hardened".
The simplest type of backup is the Full Backup. The screen shots below are from SQL Server 2005's Management Studio (SSMS). SQL Server 2000's Enterprise Manager (EM) is very similar. In SSMS you right click on the database and choose Tasks -> Backup to bring up the window shown below.
At a minimum you need to verify three things on this screen. First, that the correct database is selected. Second, that the backup type is set to FULL. Finally you need to choose the backup file name. On the Options tab you can specify whether SQL Server should replace or append the backup to the backup file. Keep in mind that the backup file is relative to where SQL Server is installed and not where you're running SSMS.
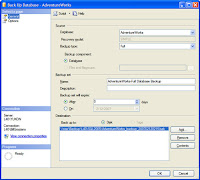
If you want to issue a backup statement yourself you can use SSMS to script it out for you. Click the Script button at the top of the dialog box and SSMS will generate this SQL statement for you:
BACKUP DATABASE [AdventureWorks] TO
DISK = N'\\nas\Backup\L40\SQL2005\AdventureWorks_backup_200702120215.bak'
WITH NOFORMAT, NOINIT, NAME = N'AdventureWorks-Full Database Backup',
SKIP, NOREWIND, NOUNLOAD, STATS = 10
You can see how these options map back to the dialog box. The NOINIT clause is what says to append the backup to the existing backup file. The other option is INIT which will overwrite the backup file. The BACKUP statement will create a single file with a BAK extension that contains what is in your data file and log file. You can backup the database while SQL Server is running and people can still use the database. It might be a little bit slower depending on your disk throughput.
Restoring a database is a little more complicated. Right-clicking on Databases in SSMS bring up a dialog box like this:
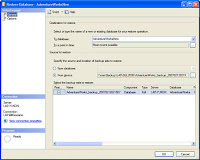
I've already changed the database name to AdventureWorksNew. I clicked the From Device radio button and navigated to my backup file. If you're restoring on the same computer where the original database resides you can just leave the From Database radio button selected and choose the database. It will automatically select the backup. Clicking on the options tab brings us to the second part of the dialog:
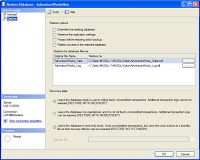
Notice that it wants to restore the two file names right on top of the file names for AdventureWorks. SQL Server won't actually let you do that unless you check the "Overwrite the existing database" checkbox above. You'll need to edit those filenames to change the name. If I script this statement out it gives me this:
RESTORE DATABASE [AdventureWorksNew]
FROM DISK = N'\\nas\Backup\L40\SQL2005\AdventureWorks_backup_200702120215.bak'
WITH FILE = 1,
MOVE N'AdventureWorks_Data' TO N'C:\Data\MSSQL.1\MSSQL\Data\AdventureWorksNew_Data.mdf',
MOVE N'AdventureWorks_Log' TO N'C:\Data\MSSQL.1\MSSQL\Data\AdventureWorksNew_Log.ldf',
NOUNLOAD, STATS = 10
Notice the MOVE commands have the new file name that I typed in.
One thing to be aware of is the SQL Server Recovery Model. If you right-click on a database and choose Properties and then click the Options tab you'll see the recovery model as the second item listed. The two main settings for this are Simple and Full. In Simple Recovery SQL Server doesn't keep transactions in the transaction log that have already been "hardened" to disk. They are automatically removed and the space in the file is reused. In Full Recovery mode SQL Server keeps every transaction in the transaction log file until you explicitly backup the transaction log. Simple Recovery mode is better for developers or servers that are only backed up nightly. In Full Recovery mode you'll need to do transaction log backups which I'll cover in a future article. If you see your database growing larger and larger the most likely cause is a growing transaction log. To resolve this, change the recovery model to Simple, backup the database and then shrink the database. You can shrink the database by right-clicking on the database and choosing Tasks -> Shrink -> Database and then clicking OK.
When you create a database, SQL Server starts with a copy of the "model" database. If you set the Recovery Model of the "model" database to Simple all future databases will start out in Simple Recovery mode.Labels: Backup, Restore, SQL Server |
| posted by WebTeks @ 5:24 AM |
|
|
|
| Saturday, November 10, 2007 |
| SQL SERVER - 2005 - T-SQL Script to Attach and Detach Database |
Following script can be used to detach or attach database. If database is to be from one database to another database following script can be used detach from old server and attach to new server.
Process to move database :
--Step 1 : Detach Database using following script
USE [master]
GO
EXEC master.dbo.sp_detach_db @dbname = N'MyDB',
@keepfulltextindexfile=N'true'
GO
--Step 2 : Move Data files and Log files to new location
--Step 3 : Attach Database using following script
USE [master]
GO
CREATE DATABASE [MyDB] ON
( FILENAME = N'C:\Data\MyDB_Data.mdf' ),
( FILENAME = N'C:\Data\MyDB_Log.ldf' )
FOR ATTACH
GO
IF EXISTS ( SELECT name
FROM master.sys.databases sd
WHERE name = N'MyDB'
AND SUSER_SNAME(sd.owner_sid) = SUSER_SNAME() )
EXEC [MyDB].dbo.sp_changedbowner @loginame=N'sa',
@map=false
GOLabels: Attach, Database, Detach, SQL Server, T-SQL |
| posted by WebTeks @ 3:35 AM |
|
|
|
|
|
|
|
|
|
|
|
|
| Previous Post |
|
| Archives |
|
|
| Links |
|
| Template by |

 |
|