Before reading this tutorial you should be familiar with ASP.NET and C# or VB.NET (examples will be provided in both C# and VB.NET). If you don't already have Visual Studio installed on your computer you can download Visual Web Developer 2005 Express Edition freely from the Microsoft website. To download AJAX Extension go to www.asp.net, click on "AJAX" tab at the top of the page, then click on the "Download" button, and at last click "Download ASP.NET AJAX v1.0" button. Save the file and run the installer. Now we can create our first AJAX-Enabled website. Open Visual Web Developer 2005 Express Edition and create a new Web Site (File -> New -> Web Site). In the "New Web Site" dialog chose "ASP.NET AJAX-Enabled Web Site" and select your desired programming language from the "Language" Combo Box. This template is installed in Visual Web Developer 2005 Express Edition because we've previously installed the AJAX Extension. When the new project is created you can see, in the Design mode, that the newly created ASP.NET page already has an ScriptManager. Every page that uses Microsoft AJAX needs to have a ScriptManager instance (and only one). In the following examples we shall implement a common AJAX development pattern called "Partial page update". Let's start with a really simple example you get to see nowadays on a lot of websites: a time control that shows the current time. For that we shall drag a Label from the Toolbox into the page and name it lblTime, and a Button called btnUpdate which has the Text property set to "Update". Now, to display the current time in the label we shall add the following code to that auto-generated handler that handles PageLoad event. [ C# ]
protected void Page_Load(object sender, EventArgs e)
{
lblTime.Text = DateTime.Now.ToString();
} [ VB.NET ]
Protected Sub _Default_Load(ByVal sender As Object, ByVal e As System.EventArgs) Handles Me.Load
lblTime.Text = DateTime.Now.ToString()
End Sub The end result should look something like image bellow. 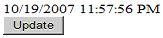
The result is a simple page with a label and a button with the label showing the time when the page was loaded. When we hit the Update button the whole page reloads and the current time is displayed in the label. What really happens is that clicking on the button triggers a postback so the Page Load handler is reached and the lblTime's Text property is updated with the current time. Ok until now... everything looks good... but the label only displays the time of a specific moment and to update it you have to hit the Update button which reloads the whole page. This is not very appealing. Let's now modify a bit the application, so it makes use of Microsoft AJAX. Notice that once the AJAX Extension was installed on the system a new tab was created in the Toolbox with some items. There are basic controls you need to create interactivity with AJAX. One of the most used controls among them is the "UpdatePanel". UpdatePanel is a very powerful control because all the controls that are nested within this control are automatically updated without page reload. Drag an UpdatePanel in the page and move the lblTime and the btnUpdate controls in this control so the aspx code behind looks something like this: <form id="form1" runat="server">
<asp:ScriptManager ID="ScriptManager1" runat="server">
asp:ScriptManager>
<asp:UpdatePanel ID="UpdatePanel1" runat="server">
<ContentTemplate>
<asp:Label ID="lblTime" runat="server" Text="Label">asp:Label>
br>
<asp:Button ID="btnUpdate" runat="server" Text="Update" />
ContentTemplate>
asp:UpdatePanel>
form> Now, let's enjoy the result. When running the application the Update button updates the time in but without reloading the entire page so that the change happens smoothly. As you see, this is a major improvement. But the real purpose of a time indicator is to display the current time, and ours only displays the current time when the Update button is hit. So, let's further improve our application. Delete the btnUpdate control from the page and add a Timer control from the AJAX Extensions Toolbar tab to the UpdatePanel in the page and set its "Interval" property to 1000. The Timer control in the AJAX Extensions triggers an postback at a specified amount of time. This is what we've done here: we're telling the page to reload itself every second. But thanks to the UpdatePanel in which this Timer is located only the UpdatePanel is reload. Now the aspx code should look like this: <form id="form1" runat="server">
<asp:ScriptManager ID="ScriptManager1" runat="server">
asp:ScriptManager>
<asp:UpdatePanel ID="UpdatePanel1" runat="server">
<ContentTemplate>
<asp:Label ID="lblTime" runat="server" Text="Label">asp:Label>
<asp:Timer ID="Timer1" runat="server" Interval="1000">
asp:Timer>
ContentTemplate>
asp:UpdatePanel>
form> And now the page displays a fully functional clock: it updates each second to display the current time. This is possible because the default value of the "UpdateMode" property is set to "Always": this tells the UpdatePanel to update itself each time one of its child controls causes a postback. The other option for the UpdateMode property is "Conditional". In order to build rich interactive user interfaces you must fully understand the functionality of the UpdatePanel. So let's modify a little bit our application and observe the changes. Let's assume that the timer is placed outside the UpdatePanel. In a real world application this a frequent situation as we can't always have a control reside inside an UpdatePanel or we want an external control to update the UpdatePanel. In this situation the timer updates each second but the whole page is reloading (you can make this more obvious by adding a large dummy text outside the UpdatePanel). To achieve the smooth update applied only to the UpdatePanel we have to add an "AsyncPostBackTrigger" element to the "Triggers" tag of the UpdatePanel and set the controlID to "Timer1" (which is the name of the timer in our page) and the "EventName" to "Tick" as Tick is the event raised by the timer each time it triggers an postback. Now the aspx code should look something like this: <form id="form1" runat="server">
<asp:ScriptManager ID="ScriptManager1" runat="server">
asp:ScriptManager>
<asp:UpdatePanel ID="UpdatePanel1" runat="server" UpdateMode="Conditional">
<Triggers>
<asp:AsyncPostBackTrigger ControlID="Timer1" EventName="Tick" />
Triggers>
<ContentTemplate>
<asp:Label ID="lblTime" runat="server" Text="Label">asp:Label>
ContentTemplate>
asp:UpdatePanel>
<asp:Timer ID="Timer1" runat="server" Interval="1000">
asp:Timer>
form> This is a basic yet complete example of how to use UpdatePanel and Timer controls and the Partial page update pattern to transform a classic ASP.NET page into an AJAX-enabled one.
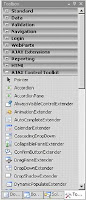
Now, we shall focus on the AJAX Control Toolkit, a free library of AJAX-enabled controls. You can download it from http://www.asp.net, click the Download button then scroll the page to the ASP.NET AJAX Control Toolkit section and hit "Download the toolkit" button. This will redirect you to the Codeplex website from where you can download the toolkit. I suggest downloading the AJAX Toolkit along with the source code as you may want in the future to modify the existing controls to match your expectations. Notice that the file being downloaded is a zip file, no msi, no installer. Extract the content of the zip file and you shall find a VS solution that you must build. You shall find the result in the bin directory. Now open Visual Studio, right-click the Toolbox and select "Add tab". Name it whatever you want or simply "AJAX Control Toolkit" and then right-click it and select "Choose Items". Navigate to the bin directory and select AjaxControlToolkit.dll. This will populate the newly created tab with AJAX-Enabled controls. Now your Toolbox should look like image above. Next we shall build another website that uses controls found in the AJAX Control Toolkit. Create a new project, add an TextBox and Label and a Button to the page and then add the following code to the button's Click handler: [ C# ]
Label1.Text=TextBox1.Text;
[ VB.NET ]
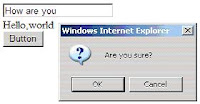
Label1.Text=TextBox1.Text Now, drag a ConfirmButtonExtender control and set its ConfirmText property to "Are you sure?" and TargetControlID property to Button1. What this controls does is that when the button is clicked it pops up a confirmation dialog with the specified text and an OK and a Cancel button. Only if the OK button is pressed the execution of the button's handler is executed as you see in image bellow.
As the name says ConfirmButtonExtender extends the functionality of a Button. The library contains a lot of other amazing and complex controls like: Accordion, TabContainer, CalendarExtender etc. It is easy to create AJAX-enabled pages in Visual Studio. On the ASP.NET official website (http://www.asp.net ) in the AJAX section you can find complete documentation on each control and even watch the controls live prooving their power. Use them to create a better user experience and ensure the kind of interactivity you've always wanted to create on the web. Labels: AJAX, AJAX Control Toolkit, ASP.Net, C#, VB |